Monday, February 2, 2015

Autolayouting for dynamically changing views in iOS(with complex UITableViewCells and UIButtons)

I have used both IB based and code based approach with autolayout. If the view is static the solution is very easy. You can use the easiest way, the IB based autolayouting. But if the view is dynamic, I have used code base and IB based approach plus few tricks.
Consider following screen shots

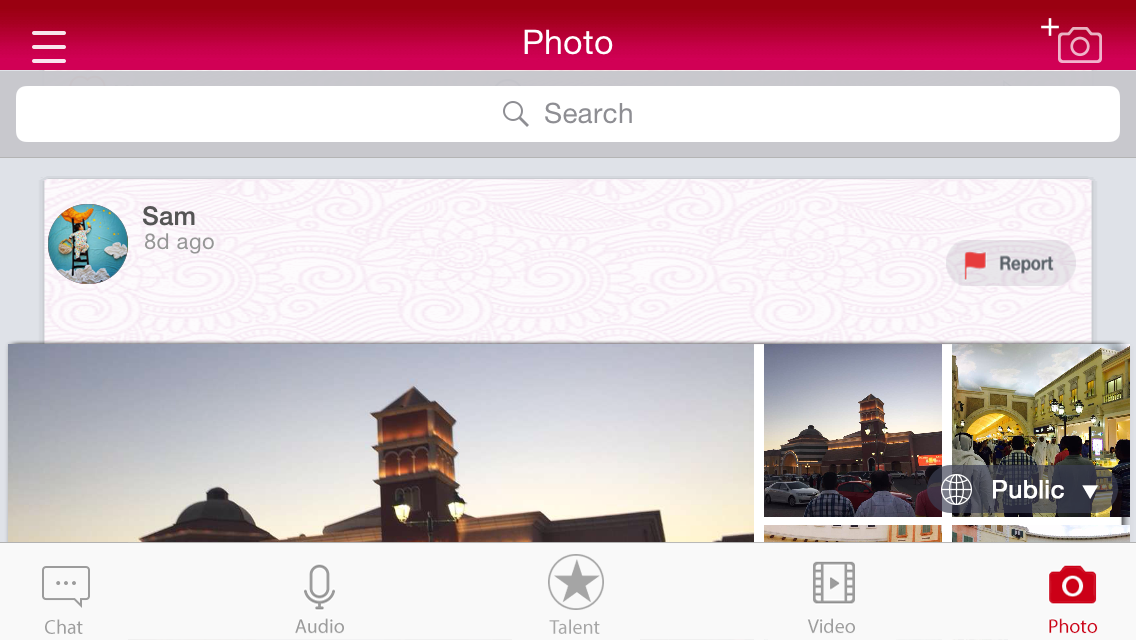
First image is taken when device is in landscape mode and second image is taken when the device is in portrait mode. Now consider the image that contains a camera, which is located at top right corner. Actually it is a UIButton with an image. If you examine carefully you will notice that the top inset of the element in the landscape mode is much lower that the in the potrait mode. This is how I implemented it.
  • Add left insets in the interface builder
  • programmatically add top insets according to the orientation
  • When the orientation change programmatically change the top insets and call setNeedsUpdateConstraints method on that view

Add these two constants in after #import section
static int buttonTopinsetLandscape = 1;
static int buttonTopinsetPotrait = 14;


- (void) adjustViewsForOrientation {
    [self addInsets];
    [photoBtn setNeedsUpdateConstraints];
}

- (void) addInsets {
  self.constraint = [NSLayoutConstraint constraintWithItem:photoBtn
         attribute:NSLayoutAttributeTop
         relatedBy:NSLayoutRelationEqual
            toItem:self.view
         attribute:NSLayoutAttributeBottom
        multiplier:1.0
          constant:[self getButtonTopinset]];

  [self.view addConstraint:constraint];
}

- (int)getButtonTopinset {
    return [self returnCurrentInset:buttonTopinsetLandscape withPotrait:buttonTopinsetPotrait];
}

- (int)returnCurrentInset:(int)landscape withPotrait:(int)potrait {
    UIInterfaceOrientation orientation = [UIApplication sharedApplication].statusBarOrientation;
    if (orientation == UIInterfaceOrientationPortrait || orientation == UIInterfaceOrientationPortraitUpsideDown) {
        return potrait;
    } else if(orientation == UIInterfaceOrientationLandscapeLeft || orientation == UIInterfaceOrientationLandscapeRight) {
        return landscape;
    } else {
        return potrait;
    }
}


In viewwillappear method add notification to listen to orientation changes as follows.
[[NSNotificationCenter defaultCenter] addObserver:self selector:@selector(adjustViewsForOrientation) name:UIDeviceOrientationDidChangeNotification object:nil];

That's cool right? lets move in to much complex example. Look at the following table view.
---UPDATE---- The example for this part of the tutorial is now available on GITHub as well.
Each cell has different number of UIImageViews from one to four. Number of UIImageViews to be displayed can only be determined at run time. And the each cell changes the image view dimensions according to orientation. Here I have to use code based approach. I have used VFL here.
When there are two image Views
NSDictionary *views = NSDictionaryOfVariableBindings(imgViewOne,imgViewTwo);
            
            [cell.contentView addConstraints:[NSLayoutConstraint constraintsWithVisualFormat:@"H:|-4-[imgViewOne(imgViewOne)]-5-[imgViewTwo(imgViewOne)]-3-|" options:0 metrics:nil views:views]];
            
            [cell.contentView addConstraints:[NSLayoutConstraint constraintsWithVisualFormat:@"V:|-95-[imgViewOne]-88-|" options:0 metrics:nil views:views]];
            [cell.contentView addConstraints:[NSLayoutConstraint constraintsWithVisualFormat:@"V:|-95-[imgViewTwo]-88-|" options:0 metrics:nil views:views]];

Here image views share the same width. Here they will retain there left and right insets to the superview and adjust their widths accordingly.
When there are three image Views

[cell.contentView addSubview:imgViewOne];
            [cell.contentView addSubview:imgViewTwo];
            [cell.contentView addSubview:imgViewThree];
            
            imgViewOne.translatesAutoresizingMaskIntoConstraints = NO;
            imgViewTwo.translatesAutoresizingMaskIntoConstraints = NO;
            imgViewThree.translatesAutoresizingMaskIntoConstraints = NO;
            
            NSDictionary *views = NSDictionaryOfVariableBindings(imgViewOne, imgViewTwo, imgViewThree);
            
            [cell.contentView addConstraints:[NSLayoutConstraint constraintsWithVisualFormat:@"H:|-4-[imgViewOne(imgViewOne)]-5-[imgViewTwo(imgViewOne)]-3-|" options:0 metrics:nil views:views]];
            [cell.contentView addConstraints:[NSLayoutConstraint constraintsWithVisualFormat:@"H:|-4-[imgViewOne(imgViewOne)]-5-[imgViewThree(imgViewOne)]-3-|" options:0 metrics:nil views:views]];
            
            [cell.contentView addConstraints:[NSLayoutConstraint constraintsWithVisualFormat:@"V:|-95-[imgViewOne]-88-|" options:0 metrics:nil views:views]];
            [cell.contentView addConstraints:[NSLayoutConstraint constraintsWithVisualFormat:@"V:|-95-[imgViewTwo(imgViewTwo)]-5-[imgViewThree(imgViewTwo)]-88-|" options:0 metrics:nil views:views]];
Here please note that width of image views are similar and height of imgViewThree and imgViewTwo are similar
When there are four image Views
NSDictionary *views = NSDictionaryOfVariableBindings(imgViewOne, imgViewTwo, imgViewThree, imgViewFour);
            
            [cell.contentView addConstraints:[NSLayoutConstraint constraintsWithVisualFormat:@"H:|-4-[imgViewOne(imgViewOne)]-5-[imgViewThree(89)]-5-[imgViewFour(89)]-3-|" options:0 metrics:nil views:views]];
            [cell.contentView addConstraints:[NSLayoutConstraint constraintsWithVisualFormat:@"H:|-4-[imgViewOne(imgViewOne)]-5-[imgViewTwo(182.5)]-3-|" options:0 metrics:nil views:views]];
            
            [cell.contentView addConstraints:[NSLayoutConstraint constraintsWithVisualFormat:@"V:|-95-[imgViewOne(178)]-88-|" options:0 metrics:nil views:views]];
            [cell.contentView addConstraints:[NSLayoutConstraint constraintsWithVisualFormat:@"V:|-95-[imgViewTwo(115.5)]-5-[imgViewThree(58)]-88-|" options:0 metrics:nil views:views]];
            [cell.contentView addConstraints:[NSLayoutConstraint constraintsWithVisualFormat:@"V:|-95-[imgViewTwo(115.5)]-5-[imgViewFour(58)]-88-|" options:0 metrics:nil views:views]];
            [imgViewTwo setContentHuggingPriority:200
                                        forAxis:UILayoutConstraintAxisHorizontal];
            [imgViewOne setContentHuggingPriority:252
                                        forAxis:UILayoutConstraintAxisHorizontal];
            [imgView3 setContentHuggingPriority:200
                                        forAxis:UILayoutConstraintAxisHorizontal];
            [imgView4 setContentHuggingPriority:200
                                        forAxis:UILayoutConstraintAxisHorizontal];
Looks cool right? But not good enough. Here for example width of each imageview is the same. But what if you need one imageview is three times of the second one? If you try to achieve this with VFL you will get a run time exception. The only way is hard coding the widths which is an extremely bad idea. Then you will have hard time when you deal with different screen sizes and orientations. So VFL is not a viable solution at all.
We still have one option left for autolayoiting. That is using pure objective C based approach without using VFL. Then we can change the height and width of each image more freely.
Assume when you have three images width of the first image is three times the width of the second and third images this is how you should change the code. And when there are four images, width of the first image is three times the width of the second image and six times the third and fourth images
//for one image
NSDictionary *views = NSDictionaryOfVariableBindings(imgViewOne);
            
            [cell.contentView addConstraints:[NSLayoutConstraint constraintsWithVisualFormat:@"H:|-5-[imgViewOne(imgViewOne)]-5-|" options:0 metrics:nil views:views]];
            
            [cell.contentView addConstraints:[NSLayoutConstraint constraintsWithVisualFormat:@"V:|-5-[imgViewOne]-5-|" options:0 metrics:nil views:views]];

//for two images
NSDictionary *views = NSDictionaryOfVariableBindings(imgViewOne,imgViewTwo);
            
             [cell.contentView addConstraints:[NSLayoutConstraint constraintsWithVisualFormat:@"H:|-5-[imgViewOne(imgViewOne)]-5-[imgViewTwo(imgViewOne)]-5-|" options:0 metrics:nil views:views]];
            
           [cell.contentView addConstraints:[NSLayoutConstraint constraintsWithVisualFormat:@"V:|-5-[imgViewOne]-5-|" options:0 metrics:nil views:views]];
            [cell.contentView addConstraints:[NSLayoutConstraint constraintsWithVisualFormat:@"V:|-5-[imgViewTwo]-5-|" options:0 metrics:nil views:views]];

//for three images
NSLayoutConstraint *ratioCons =[NSLayoutConstraint
                                               constraintWithItem:imgViewOne
                                               attribute:NSLayoutAttributeWidth
                                               relatedBy:NSLayoutRelationEqual
                                               toItem:imgViewTwo
                                               attribute:NSLayoutAttributeWidth
                                               multiplier:3
                                               constant:0];
            
            [cell.contentView addConstraint: ratioCons];
            
            NSDictionary *views = NSDictionaryOfVariableBindings(imgViewOne, imgViewTwo, imgViewThree);
            
            // Horizontal layout - note the options for aligning the top and bottom of all views
            [cell.contentView addConstraints:[NSLayoutConstraint constraintsWithVisualFormat:@"H:|-5-[imgViewOne(imgViewOne)]-5-[imgViewTwo]-5-|" options:0 metrics:nil views:views]];
            [cell.contentView addConstraints:[NSLayoutConstraint constraintsWithVisualFormat:@"H:|-5-[imgViewOne(imgViewOne)]-5-[imgViewThree]-5-|" options:0 metric
s:nil views:views]];
            
            [cell.contentView addConstraints:[NSLayoutConstraint constraintsWithVisualFormat:@"V:|-5-[imgViewOne]-5-|" options:0 metrics:nil views:views]];
            [cell.contentView addConstraints:[NSLayoutConstraint constraintsWithVisualFormat:@"V:|-5-[imgViewTwo]-5-[imgViewThree(imgViewTwo)]-5-|" options:0 metrics:nil views:views]];

//for four images
NSLayoutConstraint *ratioConsOne =[NSLayoutConstraint
                                            constraintWithItem:imgViewOne
                                            attribute:NSLayoutAttributeWidth
                                            relatedBy:NSLayoutRelationEqual
                                            toItem:imgViewTwo
                                            attribute:NSLayoutAttributeWidth
                                            multiplier:3
                                            constant:0];
            
            NSLayoutConstraint *ratioConsTwo =[NSLayoutConstraint
                                               constraintWithItem:imgViewOne
                                               attribute:NSLayoutAttributeWidth
                                               relatedBy:NSLayoutRelationEqual
                                               toItem:imgViewThree
                                               attribute:NSLayoutAttributeWidth
                                               multiplier:6
                                               constant:0];
            
            NSLayoutConstraint *ratioConsThree =[NSLayoutConstraint
                                               constraintWithItem:imgViewOne
                                               attribute:NSLayoutAttributeWidth
                                               relatedBy:NSLayoutRelationEqual
                                               toItem:imgViewFour
                                               attribute:NSLayoutAttributeWidth
                                               multiplier:6
                                               constant:0];
            
            [cell.contentView addConstraint: ratioConsOne];
            [cell.contentView addConstraint: ratioConsTwo];
            [cell.contentView addConstraint: ratioConsThree];
            
            NSDictionary *views = NSDictionaryOfVariableBindings(imgViewOne, imgViewTwo, imgViewThree, imgViewFour);
            
            [cell.contentView addConstraints:[NSLayoutConstraint constraintsWithVisualFormat:@"H:|-5-[imgViewOne(imgViewOne)]-5-[imgViewTwo]-5-|" options:0 metrics:nil views:views]];
            [cell.contentView addConstraints:[NSLayoutConstraint constraintsWithVisualFormat:@"H:|-5-[imgViewOne(imgViewOne)]-5-[imgViewThree]-5-[imgViewFour]-5-|" options:0 metrics:nil views:views]];
            
            [cell.contentView addConstraints:[NSLayoutConstraint constraintsWithVisualFormat:@"V:|-5-[imgViewOne]-5-|" options:0 metrics:nil views:views]];
            [cell.contentView addConstraints:[NSLayoutConstraint constraintsWithVisualFormat:@"V:|-5-[imgViewTwo]-5-[imgViewThree(imgViewTwo)]-5-|" options:0 metrics:nil views:views]];
            [cell.contentView addConstraints:[NSLayoutConstraint constraintsWithVisualFormat:@"V:|-5-[imgViewTwo]-5-[imgViewFour(imgViewTwo)]-5-|" options:0 metrics:nil views:views]];

Here I am using the pure objective c based approach along with VFL. Actually pure objc approach alone could have been used. I have mixed both the approach since it clearly shows the limitations of the VFL. In some dynamic UIs we have to use pure code based appproach. This example nicely shows it. But use of either VFL or objective c code approach result in verbose code. So in order to keep the code base nice and clean, many use wrappers around autolayout API. My personal preference is keeplayout library. I have extensivly used it and I would highly recommend it.
---UPDATE---- The example for this part of the tutorial is now available on GITHub as well.
For any query, feel free to contact me via my linkedin profile.

Monday, January 5, 2015

Dynamically changing rotation in iOS

I had a requirement to dynamically enable and disable the rotation of an iOS. We had a navigation controller throughout the app. First you need to enable landscape and potrait mode using Xcode. You can specify this in the deployment info section in the XCode
When we dynamically change the rotation, we need to change the rotation not only in the viewcontroller, but also in the navigation controller. Next you need to create a category of UINavigationController which supports for dynamic orientation changes. Here you need to overide two methods

-(bool)shouldAutoRotate and -(NSUInteger)supportedInterfaceOrientation
This is how they were overridden.


We need a boolean instance variable to determine whether we should rotate or not. Here. I have used iOS run time programming to assign value for this boolean value. Because we can't synthasis instance variables in a category. Also I am using a NSNumber variable instead of a boolean primitive.


Here KNewProertyKey is declared as follows


When you need to enable or disable rotation you just need to set the status with setRotationStatus method.
After that we can dynamically enable and disable the rotation. For any query, feel free to contact me via my linkedin profile.

Tuesday, November 4, 2014

Concurrency problems in singleton design pattern - An objcective c example

Singleton pattern is a very common pattern in iOS. It is one of the easiest to understand. But if you do not fully consider the concurrency, you will come across bugs which are extremely difficult to find. Have a look the following code which looks completely normal.
+ (instancetype)sharedInstance    
{
    static SomeClass *obj = nil;
    if (!obj) {
        obj = [[SomeClass alloc] init];
    }
    return obj;
}
Looks normal right? But really it is not the case.
Here the if condition branch is not thread safe. If this method is invoked with multiple threads, this may happen. Assume you have two threads(A and B). Now A enters the if block and a context switch occurs before
obj = [[SomeClass alloc] init];
is executed. Next thread B enters the if block and allocates an instance of the singleton and exit. Then thread A gets the chance. It also starts inside the if block and creates the instance. Now you have two instances. Clearly this is not what you need in singleton pattern.

Solution
+ (instancetype)sharedIinstance
{
    static SomeClass *obj = nil;
    static dispatch_once_t onceToken;
    dispatch_once(&onceToken, ^{
        obj = [[SomeClass alloc] init];
    });
    return obj;
}

Here dispatch_once() executes the block only a one time in a thread safe manner. So different threads will not be able to access the critical section as I showed earlier.
This is not the only problem with singleton. Here only instantiation is thread safe. A Class may have mutable objects. In that case we need to consider about the thread safety status of those objects. Otherwise reader writer problems may occur.
Assume you have a NSMutableArray inside the singleton class and you have read and write operations in to that NSMutableArray object. you need to do two things in order to ensure thread safety. Here there is a possibility for a reader/writer problem scenario.
What is the reader/writer problem?
Assume you are going to make an online purchase and there is only one item left. As long as you are doing only read operations it is ok. But if you do any database write operations there may be problems. If someone completes a transaction while you are doing the transaction a problem will occur. It is called the reader/writer problem.
With apple GCD we have a very easy solution for that. GCD has an implementation of a reader/writer queue. GCD manages everything for us. A dispatch barrier creates a synchronization point inside a concurrent dispatch queue. GCD ensures that the submitted block is the only item executed on the specified queue for that particular time. All items submitted to the queue prior to the dispatch barrier must complete before the execution of the block. After the block is finished queue returns to the its specified implementation.
We have a NSMutableArray as follows.
@property (nonatomic, strong) NSMutableArray array;

And read and write operations as follows.
- (void)addObject:(NSObject *)obj
{
    if (obj) {   
     [_array addObject:obj]; 
    }
}

- (NSArray *)getObj
{
    NSArray *array = [NSArray arrayWithArray:_array]; 
    return array;
}

Add this to the header file
@property (nonatomic, strong) dispatch_queue_t concurrentQueue;

Then when you add to the NSMutableArray instance, the adding object operation should be added with a dispatch barrier.
- (void)addObject:(NSObject *)obj
{
    if (photo) { 
        dispatch_barrier_async(self.concurrentQueue, ^{  
            [_array addObject:obj]; 
        });
    }
}

Also when you read data from the mutable array also you should do it via a serially dispatched block as follows.
- (NSArray *)getObj
{
    __block NSArray *array; 
    dispatch_sync(self.concurrentQueue, ^{ 
        array = [NSArray arrayWithArray:_array]; 
    });
    return array;
}

Now your singleton is thread safe!! For any query, feel free to contact me via my linkedin profile. Happy coding!!!

Tuesday, August 5, 2014

Proxy design pattern using core data

Normally Core data models extend from NSManaged objects. So the model objects we use are tightly coupled with core data. What if we need to keep our models independent over core data? Such an approach will be more flexible since the model objects can be easily reused even when we do not want to use core data. We can use protocols to achieve this effect. We can create a protocol and our core data models categories will conform to that protcol. Here is an example This is a message Entity which can be used to represent a chat message
Message.h

#import 
#import 

@interface Message : NSManagedObject

@property (nonatomic, retain) NSDate * date;
@property (nonatomic, retain) NSNumber * dirty;
@property (nonatomic, retain) NSString * entityID;
@property (nonatomic, retain) NSData * resource;
@property (nonatomic, retain) NSString * resourcePath;
@property (nonatomic, retain) NSString * text;
@property (nonatomic, retain) NSNumber * type;
@property (nonatomic, retain) NSNumber * didRecieve;

@end
Message.m
#import "Message.h"

@implementation Message

@dynamic date;
@dynamic dirty;
@dynamic entityID;
@dynamic resource;
@dynamic resourcePath;
@dynamic text;
@dynamic type;
@dynamic didRecieve;

@end
The protocol for generic messages
@protocol PMessage 

-(NSNumber *) type;
-(NSString *) text;
-(NSString *) fontName;
-(NSNumber *) fontSize;
-(NSString *) textColor;
-(UIImage *) textAsImage;
-(BOOL) isMine;
-(NSString *) color;
-(void) setColor:(NSString*)color;
-(NSDate *) date;
-(UIImage *) thumbnail;
-(NSString *) entityID;
-(BThread *) thread;
-(NSNumber*)didRecieve;

@end
this is the header file of the NSManagedObject category which confirms to the protocol
#import "Message.h"
#import "PEntity.h"
#import "PMessage.h"

@interface Message(Additions)

-(BOOL) sameDayAsMessage: (Message *) message;
-(NSComparisonResult) compare: (Message *) message;
-(BOOL) isMine;
-(float) getTextHeightWithFont: (UIFont *) font withWidth: (float) width;
-(UIImage *) textAsImage;
/**
Other presentation specific methods
****/

@end
The implementation of those methods resides within the .m file of the Message category. Through out the code I can refer to the message entity via PMessage protocol. The actual object whether it is a Message entity or some other message entity with some other non-core data storage mechanism, is determined at the run time. Assume you have developed a new storage mechanism that far exceeds the capabilities of core data. Now it is the time for use it. These are the steps you will have to preform
  • Create the model class based on the new storage mechanism.
  • Create a category of the model class based on the new storage mechanism that conforms to PMessage protocol

in the code I am always referring to the PMessage protocol. Because of that despite the actual object which encapsulates the actual data persistence mechanism all the object of PMessage type can be accesed with a uniform interface. For any query, feel free to contact me via my linkedin profile.

Monday, August 4, 2014

iOS date picker with a done button

I had to create a date picker with a done button. I am sharing that experience with this post. These are the steps I used.
  1. Create a UIView and add UIDatePicker to it
  2. Add a done buttton
  3. Add ability to assign a selector to done button. So we can respond to the click event

This is the code for the implementation
DatePicker.h file
//
//  DatePicker.h

#import 

@interface DatePicker : UIView

@property (nonatomic, assign, readonly) UIDatePicker *datePicker;
@property (nonatomic, readwrite) float pickerHeight;

- (void) setDatePickerMode: (UIDatePickerMode) mode;
- (void) addTargetAndSelectorForDoneButton: (id) target action: (SEL) action;

- (id) initWithFrame: (CGRect) frame withHeight:(float)height;

@end


DatePicker.m file

#import "DatePicker.h"

@interface DatePicker ()

@property (nonatomic, readwrite) UIDatePicker *datePicker;
@property (nonatomic, assign) id doneTarget;
@property (nonatomic, assign) SEL doneHandler;

@end

@implementation DatePicker

@synthesize datePicker = _datePicker;
@synthesize pickerHeight = _pickerHeight;
@synthesize doneTarget = _doneTarget;
@synthesize doneHandler = _doneHandler;

- (id) initWithFrame: (CGRect) frame withHeight:(float)height{
    if ((self = [super initWithFrame: frame])) {
        self.backgroundColor = [UIColor clearColor];
        _pickerHeight = height;
        
        UIDatePicker *picker = [[UIDatePicker alloc] initWithFrame: CGRectMake(0, _pickerHeight, frame.size.width, frame.size.height - _pickerHeight)];
        [self addSubview: picker];
        
        UIToolbar *toolbar = [[UIToolbar alloc] initWithFrame: CGRectMake(0, 0, frame.size.width, _pickerHeight)];
        toolbar.barStyle = UIBarStyleBlackOpaque;
        toolbar.autoresizingMask = UIViewAutoresizingFlexibleWidth;
        
        UIBarButtonItem *doneButton = [[UIBarButtonItem alloc] initWithTitle: @"Done" style: UIBarButtonItemStyleBordered target: self action: @selector(donePressed)];
        UIBarButtonItem* flexibleSpace = [[UIBarButtonItem alloc] initWithBarButtonSystemItem:UIBarButtonSystemItemFlexibleSpace target:nil action:nil];
        toolbar.items = [NSArray arrayWithObjects:flexibleSpace, doneButton, nil];
        
        [self addSubview: toolbar];
        
        self.datePicker = picker;
        picker.autoresizingMask = UIViewAutoresizingFlexibleWidth|UIViewAutoresizingFlexibleHeight|UIViewAutoresizingFlexibleTopMargin|UIViewAutoresizingFlexibleBottomMargin;
        
        self.autoresizesSubviews = YES;
        self.autoresizingMask = UIViewAutoresizingFlexibleWidth|UIViewAutoresizingFlexibleHeight|UIViewAutoresizingFlexibleTopMargin|UIViewAutoresizingFlexibleBottomMargin;
    }
    return self;
}

- (void) setDatePickerMode: (UIDatePickerMode) mode {
    self.datePicker.datePickerMode = mode;
}

- (void) donePressed {
    if (self.doneTarget) {
        [self.doneTarget performSelector:self.doneHandler withObject:nil afterDelay:0];
    }
}

- (void) addTargetAndSelectorForDoneButton: (id) target action: (SEL) action {
    self.doneTarget = target;
    self.doneHandler = action;
}


Thursday, June 5, 2014

Tips for efficient objective c code - I

Before thinking about code optimizations it is better to refresh about how an objective C code would run.
The preprocessor
Before the C compiler the preprocessor takes over. This is invoked automatically by the compiler before the compilation process. Here the preprocesssor modifies your source file. compiler uses this modified file for the compilation process. Preprocessor converts the prepocessor commands in to the meaningful source code. For example consider define command. This is mainly used to define constants. For instance,
If you have
    int no = NUMBER;
prepocessor converts this as follows.
    int no = 100;

#include 
Here the preprocessor pasts the content of header file to the at the location of the #include directive.
Compiler
Next the compiler takes over and converts the source file into an object file. The file ends in .o. This file is not directly executable. It lacks sources code for library functions that were included by #include directive.
Linker
Just like the preprocessor linker is a separate program. What linker does is link together several object files into a single binary executable. Here these several object files means following files
  1. object file created in the compilation process
  2. object files that are pre compiled and collected as library files
Also when we talk about optimization, it is better to know more about objective c. Objective C unlike Java or C++ uses messaging. NOT FUNCTION CALLING. When messaging is used the runtime decides which code to execute. But in function calling it's compiler. If you are familiar with C++, you should know about the virtual table, which is used for run time look ups. It was used to support the polymorphism feature. But in objective c, since we are using messaging, the look up is always at the runtime. In objective c, bulk of the work is done by the runtime. The runtime contains all the data structures for OOP features, memory management functions etc. because of this, unlike other languages, when the runtime is updates and optimized, you app will get more faster.
minimizing header imports
if you want to import something, except it is super class header or a protocol you can use forward declaration. In other words if your header file only needs that the class to be imported exist, always use a forward declaration. And in the .m file use the header file import. As I pointed out if you are using protocols, you need to import the header file anyway. So make sure that the protocol contains only the method needed by the the particular class. If it contains methods that are not currently used by the current class, it is better to split the protocol in to few files.
Read instance variables directly but write them using the property
When you directly access the the variable you can bypass the getter code generated by the compiler. So it is much faster. directly setting the variable without using the property is also the same. But if you are not careful it may lead to bugs that are very hard to debug. Since when you directly access, the code including the memory management code generated by the compiler will be bypassed. For example if your property is declared as copy, if you use the direct access to modify the variable, the variable will not be copied. The new value will be retained and the old value will be released. In addition if you are using KVO, KVO will not be fired in direct access. So for the modifying it is safe not to use direct accessing.
Overiding -(NSUIInteger)hash methods correctly.
This method and -(BOOL)isEqual method plays a very important part when determining equality of two objects. If isEqual is returning true for two objects, it should always return the same value in the hash method. But objects that return the same hash value, may not return true in isEqual. This should be understandable if you are familiar with hashing. If there is a collision different objects goes to the same hash bucket, then we have to use something like double hashing or linear probing to correctly index the item. According to Apple WWDC 2013 Apple uses linear probing in their hashing algorithms. Assume you have a hash method as follows
-(NSUIInteger)hash {
    returns 1345435;
}
This is an absolutely correct implementation and hash code computation is super fast. But there is a huge drawback. If these objects are inserted in to a collection which employes hashing, it will lead to big performance issues. Because hash is used as an index within the hash table that the collection uses. For example assume you are usng a set. And you are using above mentioned hash function. Here set uses the hash function to put each objects in the internal representation. Since the hash code is a constant, all objects will end up in the same hash bucket. So you will not gain any performance gain by hashing. So hard coding the hash is not the best approach. consider the following implementation.
-(NSUInteger)hash {
     NSString *stringHash = [NSString stringWithFormat:@"%@:%@:%i",_firstName, _lastName, _age];
     return [stringHash hash];
 }
Here the implementation is correct since when isEqual return true, hash function will return the same value. But the hash function is slow, since a string is created.
-(NSUInteger)hash {
    NSUInteger nameHash = [_firstName hash];
    NSUInteger lastNameHash = [_lastName hash];
    NSUInteger ageHash = _age;
    
    return nameHash^lastNameHash^ageHash;
 }
This function is much faster than the earlier approach. And have a good range of hashes as well. So this is a better compromise between the speed of the hash algorithm and the range of hashes.

Tuesday, January 7, 2014

Youtube iOS app like rotation for MPMoviePlayerViewController

Recently I had to implement youtube iOS app like rotation for MPMoviePlayerViewController. So the video can be correctly rotated. This is how I did it.
1 Listen for the UIDeviceOrientationDidChangeNotification notification.
2 Rotate the MPMoviePlayerViewController as needed.

Here is the code for rotation
- (void)detectOrientation {
    NSLog(@"handling orientation");
    [self setMoviePlayerViewOrientation:[[UIDevice currentDevice] orientation]];
}

- (void)setMoviePlayerViewOrientation:(UIDeviceOrientation)orientation {
    double height = [UIScreen mainScreen].bounds.size.height;
    //Rotate the view!
    CGFloat degree = 0;
    
    [UIView beginAnimations:nil context:NULL];
    [UIView setAnimationDuration:0.5];
    switch (orientation) {
        case UIDeviceOrientationPortrait:
        case UIDeviceOrientationPortraitUpsideDown:
            degree = 0;
            moviePlayerController.view.bounds = CGRectMake(0, 0, 320, height);
            break;
        case UIDeviceOrientationLandscapeLeft:
            degree = 90;
            moviePlayerController.view.bounds = CGRectMake(0, 0, height, 320);
            break;
        case UIDeviceOrientationLandscapeRight:
            degree = -90;
            moviePlayerController.view.bounds = CGRectMake(0, 0, height, 320);
            break;
        case UIDeviceOrientationFaceUp:
            if (previousOrientation == UIDeviceOrientationLandscapeRight) {
                degree = -90;
                moviePlayerController.view.bounds = CGRectMake(0, 0, height, 320);
            } else if(previousOrientation == UIDeviceOrientationLandscapeLeft) {
                degree = 90;
                moviePlayerController.view.bounds = CGRectMake(0, 0, height, 320);
            } else if (previousOrientation == UIDeviceOrientationPortraitUpsideDown || previousOrientation == UIDeviceOrientationPortrait) {
                degree = 0;
                moviePlayerController.view.bounds = CGRectMake(0, 0, 320, height);
            }
            break;
        default:
            break;
    }
    //lastOrientation = orientation;
    CGAffineTransform cgCTM = CGAffineTransformMakeRotation((degree) * M_PI / 180);
    moviePlayerController.view.transform = cgCTM;
    [UIView commitAnimations];
    [[UIApplication sharedApplication] setStatusBarOrientation:orientation];
    previousOrientation = orientation;
}

In order fire this method we need to add an observer to the UIDeviceOrientationDidChangeNotification. So inside the viewDidLoad method, the following code need to be added.
[[NSNotificationCenter defaultCenter] addObserver:self selector:@selector(detectOrientation) name:@"UIDeviceOrientationDidChangeNotification" object:nil];

Now you will have a rotation similar to the Youtube iOS app. Happy coding!!!

UPDATE
 As for iOS 8, this is not needed. New SDK handles this by itself!!!! :D :D